One of the hardest things to do on a regular basis, especially if you are a housewife with young children and NOT a lot of experience, is to have dinner ready for your husband as soon as he gets home.
BUT, this is so hard, when you have 1 child crawling around unsupervised, another painting on the table (not the paper) with watercolors, and the last one is whining at you because they filled up on snacks but are still not satisfied –even though he won’t even eat the dinner it took you and hour to make! And then your husband comes in, and trips over the shoes in the doorway, and the first thing he hears is you snapping and yelling at your oldest – even though you managed not to yell ALL DAY. And the onions are burning on the stove, so dinner doesn’t even smell good, and now you just want to cry.
If reading that scenario gave you All. The. Feels., then you know the Arsenic Hour Struggle is real – and you need help with it.

Get Our Mid-Century Mom Daily Routine FREE!
This post contains affiliate links. If you click a link and make a purchase, I may receive, at no additional cost to you, a small commission. Find out more on my Disclosures page, and thank you so much for your support!
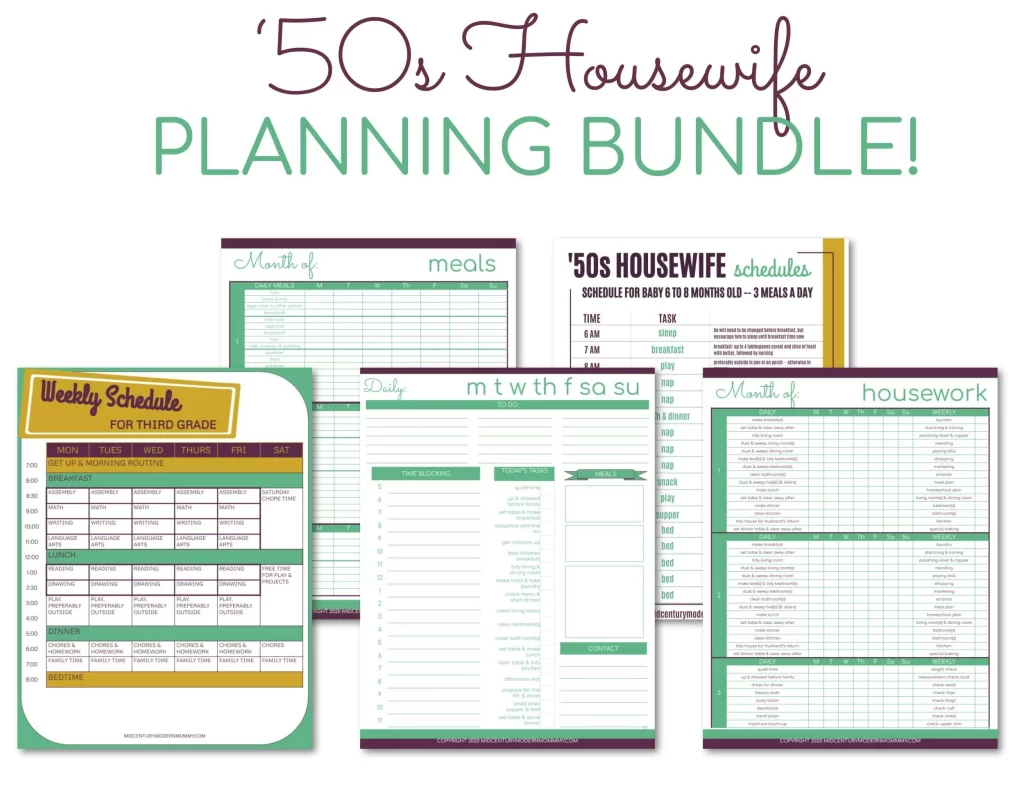
Vintage Meal Planning System
Planning ahead starts with a kitchen cleaning routine so that you have a clean place to work, a meal plan (and system) that ensures you have the idea and the ingredients when the difficult moment comes, and a cooking plan for actually preparing the meal.
You need to know what to make for dinner. Vintage meal planning systems are so helpful here! The basic meal-planning system is:
- Plan the menu for the meal (I keep my menus on hand to refer to when my brain doesn’t want to be novel)
- Plan the food shopping.
- Prepare the meal
- Serve the meal
- Clean up afterwards

The Importance of Family Dinner
I believe that there’s only one right answer when it comes to having dinner ready for your husband when he gets home from work – and that’s to do it! While it may be viewed as an outdated concept by some, I see it as a time-honored tradition that should be continued in every home.
Not only does it show your husband that you love and appreciate him, but it also helps to establish a sense of structure and stability in the home. By having dinner ready and waiting for him when he arrives, you’re creating an environment that is conducive to relaxation and peace – something that is so important in today’s fast-paced world.
Obviously, every family is unique and some couples may choose to divide household duties differently. However, the act of preparing a meal for a loved one is the most meaningful way to show love and respect. It’s an opportunity to nourish body and soul, and to create a sense of connection and closeness, and family.
Step 1: Plan the Meal
I like to keep a record of my meals, and also plan ahead. But since I don’t always have a lot of time, I use this system to keep track and have a whole catalog of good menus and meal ideas.
1. Make a list
Start by making a list of all your family’s favorites. Classify them by the type of dish. As an example, I have a vintage cookbook with 9 pages of dishes categorized by main dish, sides, breads, desserts, garnishes, appetizers, etc.
The main dishes are broken down by type of protein. The sides are classified as yellow vegetable, green vegetable, or other – for nutrition purposes. And so on.
As you make a list, do the same. Group your family’s favorites by type of dish first. If it is a specific recipe, note down where to find the recipe. I tend to cook by method, which means that I read a TON of recipes for similar dishes, and then combine my favorite twists into the best cooking method for that dish. So I don’t usually write down a specific source. I just write down the dish and research it in my reading time.
2. Experiment with combinations
The next step after listing your family’s favorites is to put those favorites into favorite menus. For this, you are going to combine those favorite main dishes with sides that your family loves you to serve with them, or that you always have wanted to serve with them. And for this you need to set up a chart!
Here’s an example:
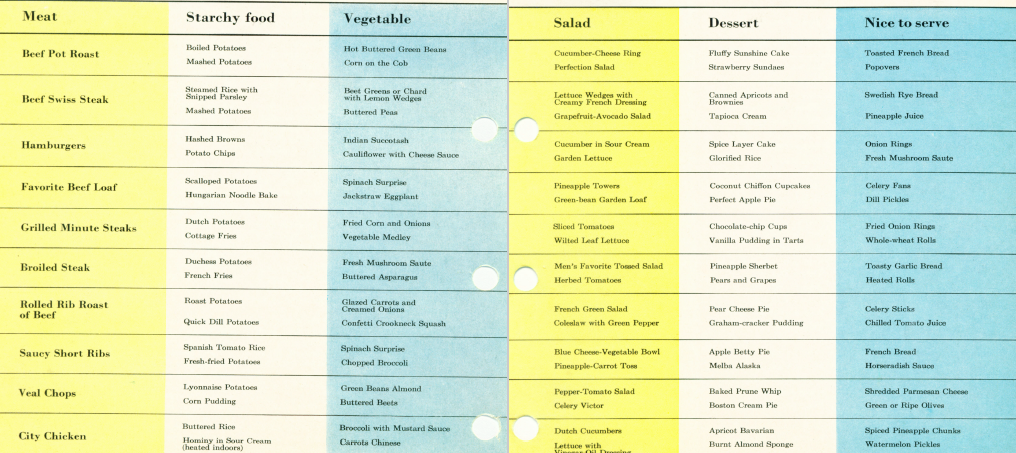
So, you want to put the different parts of the old-fashioned square meal formula along the top of the chart, and then fill in the dishes in each row. Obviously, you can have more than one set of accompaniments that you want for each main dish. But the chart will work better for you if you include only one meal in each row.
You also are going to want to put together Spring/Summer meals and Fall/Winter meals, because the main dishes may not change much around the year, but the side dishes will probably be more seasonal.
And of course, this brings up the question of what are the “Square Meal Formulas”?
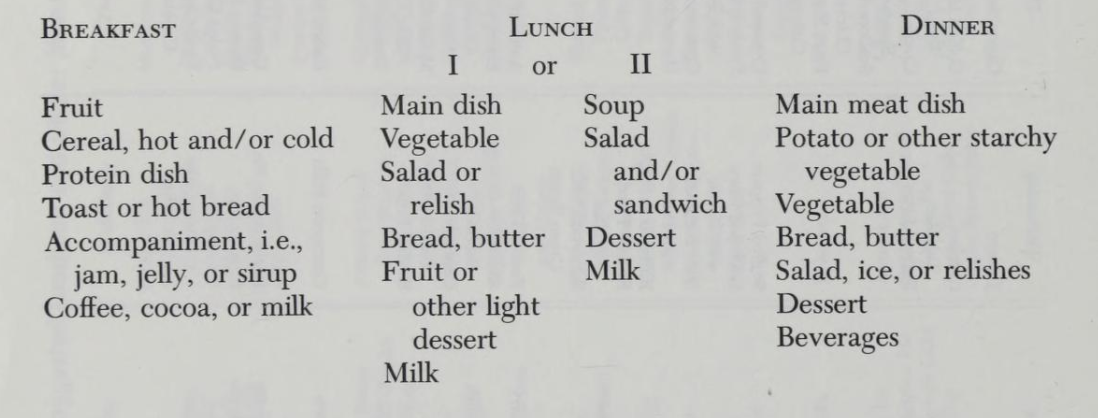
These are the slightly fancier forms of 3 square meals a day, with the lunch formula also being the supper formula. These are geared toward adults, by the way, and not kids.
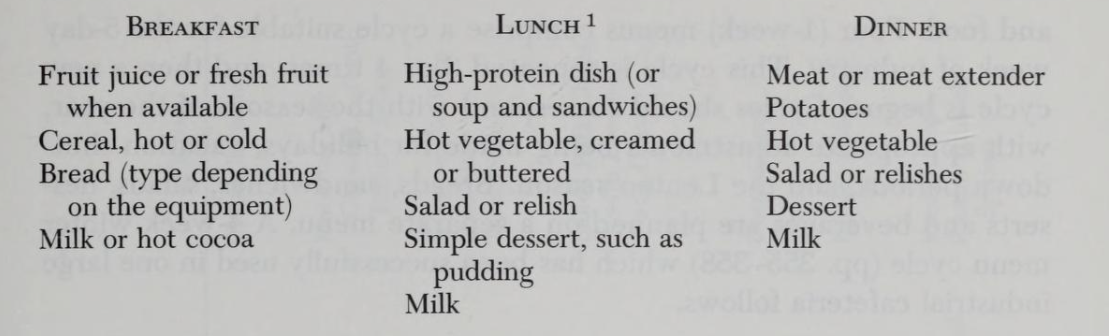
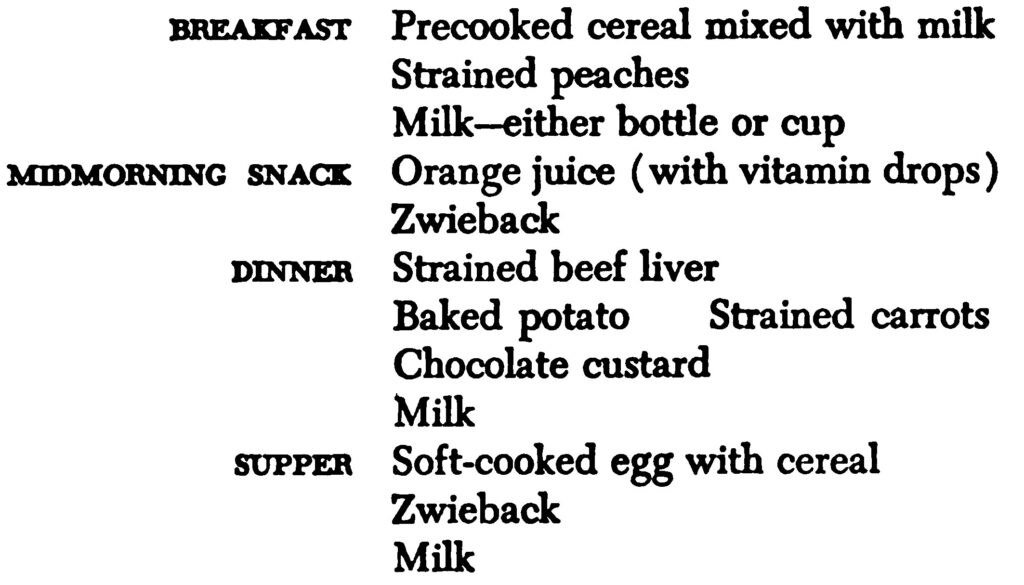
Here is what 3 square meals a day looks like when school-age children are the primary target, not including plain bread-and-butter, which should also be served to “fill in the corners”:
The formula for the younger nursery meals looks like this, although this is a sample menu:
By the time the child is 2, his menus look more like the children’s formulas above. I have a whole article about nursery meals, too.
And as a gracious living advocate, I like to dress up the dinner menu. So I like to add an appetizer, a bread option, a salad AND a relish, and garnishes that are suited for that menu.
3. Write down your menus
So the next step is going to seem familiar, but actually, homemaker card files go back to the 1910s. The first mention I have found of having a file of index cards to organize your housekeeping is in Household Engineering by Mrs. Fredricks from 1917.
Start by writing down your menu on the front of the index card. Now look at all the ingredients that you need for the main dish. Write those ingredients down on the back of that card. Now take cards for each side dish. Write the dish on the front, and the list of ingredients for that particular side dish on the back of the card. If you’ve already made one for this side dish, then don’t repeat it! Just one card per side dish from your family’s list of favorites.
Keep repeating this process until you have worked through all your menus. You can just do this every time you choose that menu; you don’t have to do it all at once.

Step 2: Plan the Food Shopping
The most important thing you can do is to plan your food shopping in advance. It saves time, energy, money and sanity.
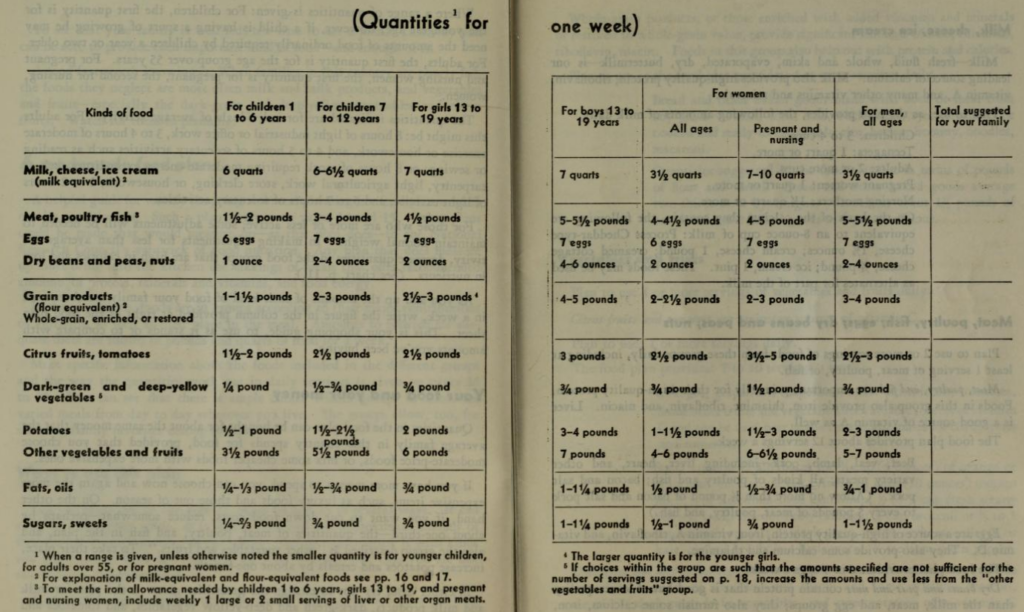
Work out how much food to buy
Vintage food buying was based on providing a set amount of bulk food and calories, and how to divide that bulk in the most nutritious but also economical manner. Charts showed how much of each kind of food was needed at different ages on a weekly basis. Here’s one chart:
In case you were wondering, the idea of recommended allowances came around because 1 out of 9 men drafted or recruited for WWII military service were rejected due to the long-term consequences of malnutrition during the Great Depression. Remember Steve Rogers?
So the idea is to go through and add up how much food of each kind your family needs IN TOTAL the whole week. Keep a note of how much quantity you need to buy. This is how you will keep your food costs under control.
Plan your cooking and shopping weekly
The vintage method of shopping was to shop for staples and non-perishables weekly, and for produce, meat, and dairy daily. Thanks to modern refrigerators, we usually have enough space now to shop only weekly, but fortunately this method can be adapted to whatever kind of shopping you need to do.
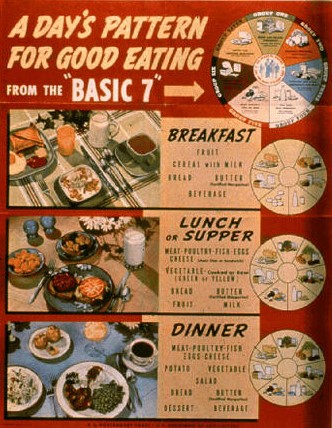
The first step is to pick out your menu cards, which are based on a daily food needs plan like this:
And here’s one for food on a daily basis:
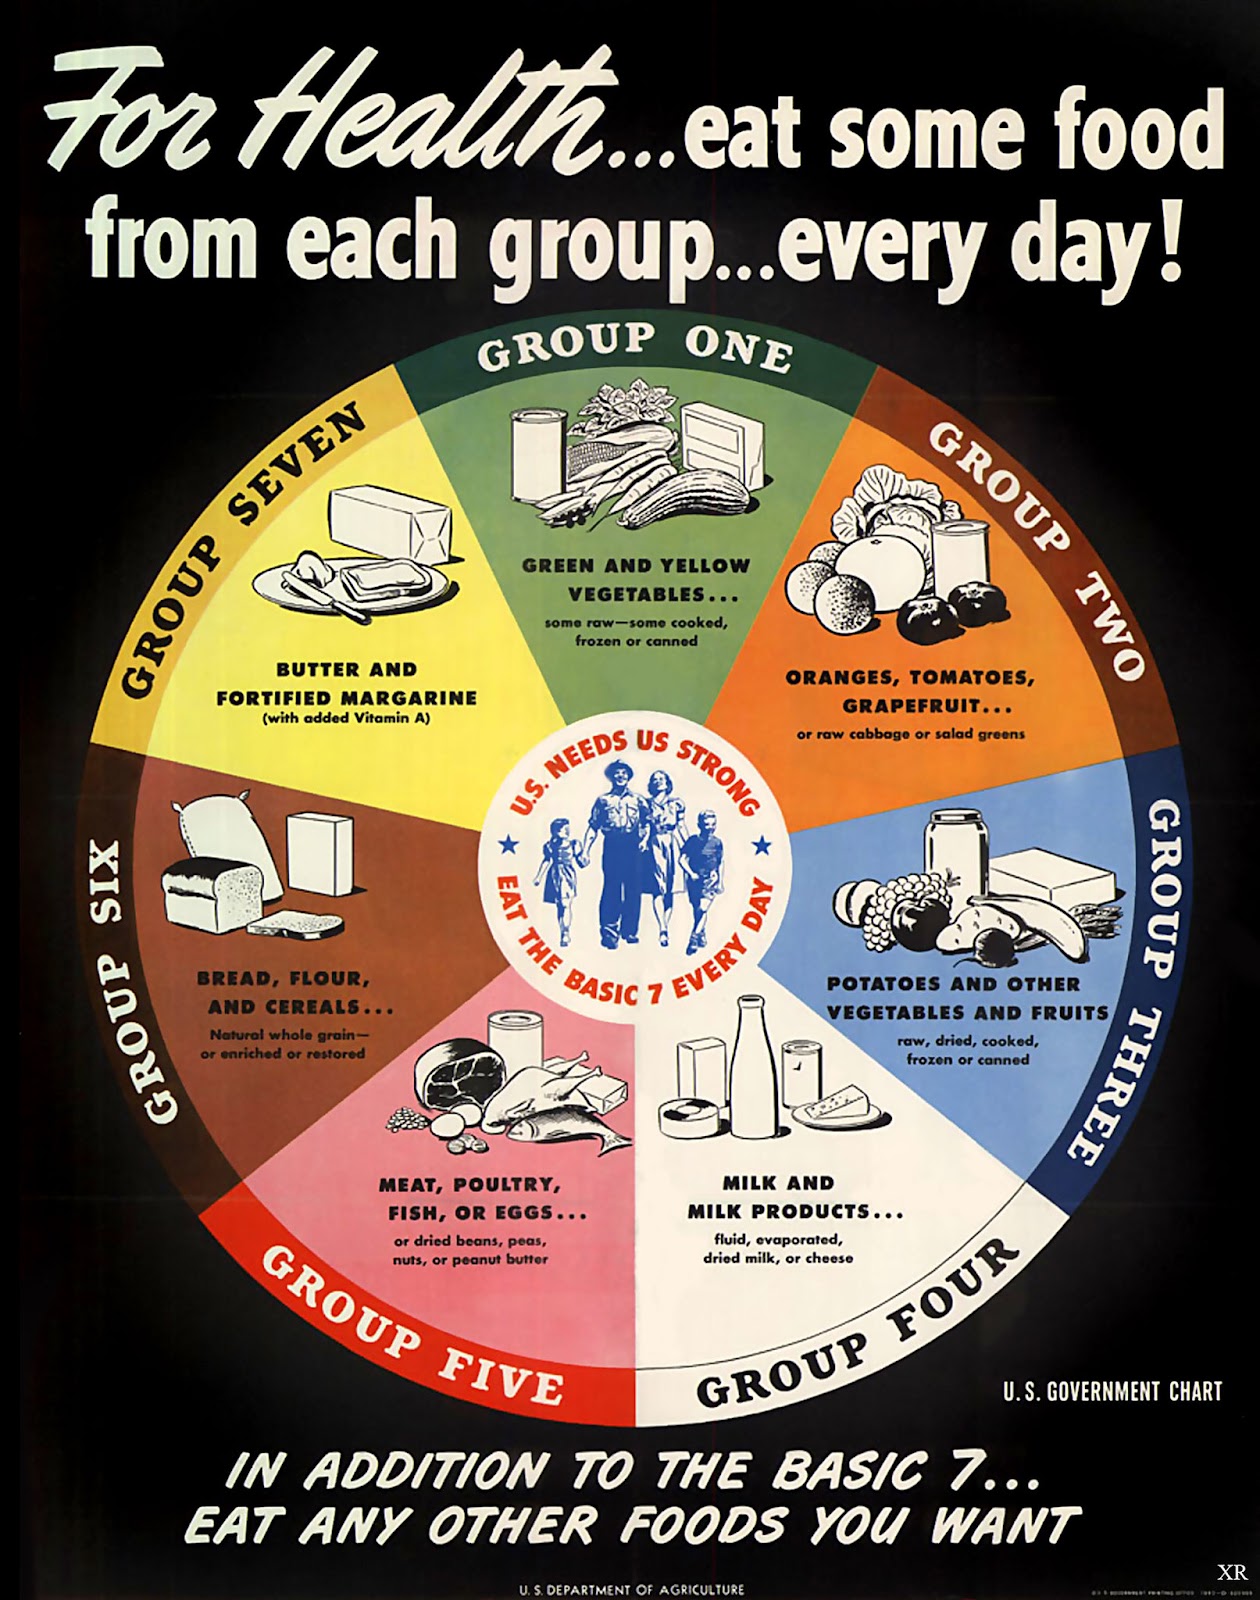
Which goes with THIS one:
So you pick the week’s menus to spread out the weekly food amounts that you need to get, economically speaking, with the daily variety and interest.
Incidentally, I classify my menus based on the most expensive ingredient, which is usually the main dish protein. So my menus are kept ordered by pork, beef, etc., and then subdivided by season so that I can use more seasonal vegetables. I also keep a list of foods to use during each month.
Make a Shopping List
Once you pick the menus, then you can make a grocery list. To do this, you need to take the cards for the week, flip them over, and copy down the ingredients you need onto your list. Don’t forget side dishes!
Group the list by type of food or food department in the grocery store: keep all the dairy together, the baking, the produce, etc. Use tally marks to keep track of how many different meals you need that food for. Then you will know how much to buy for the week, and whether you need a little more or a little less of this thing or that one.
When you are finished, you’ll have your weekly shopping list all planned.
Step 3: Prepare the Meal
Of course, after your meal planning system, you’ll need a cooking plan. In food service and the hospitality industry, these are called work schedules or mise-en-place, and they help a professional team to stay organized. But they are also ASTOUNDINGLY helpful to the average homemaker.
If you are NOT experienced in preparing a meal – cooking and serving a whole meal – and not just cooking or baking, you will most likely need to make a detailed cooking plan for your meal. After about a decade, I can just hold a summary cooking plan in my head for each meal, but I do write it down whenever I have my children working with me or cooking on their own, because they need to learn how to do it.
Order of Work
Here’s an example of a cooking plan for a menu of:
- Vegetable Juice Cocktail
- Swiss Steak
- Scalloped Potatoes
- Buttered Peas
- Olives and Celery Curls
- Cranberry Salad
- Ice Box Rolls
- Vanilla Ice Cream (purchased) and Hot Chocolate Sauce
- Beverages
This menu, being for my family, is meant to serve 10 people, so the quantities listed are for 10. Here’s the cooking plan, beginning with prepping ahead of time.
- Make these the night before, right after breakfast, or at least before 3 pm, or use bought:
- Raw cranberry and orange salad (double recipe)
- Icebox roll dough (triple)
- Mayonnaise (1/2 pint)
- Hot chocolate sauce (1 quart)
- (If you are making ice cream from scratch, do it now – 2 quarts)
- Peel the potatoes (5 lbs) and slice
- Put the vegetable
- 3 pm: prepare the white sauce (1 quart) and scalloped potatoes (2 pans)
- 3:15 pm: light ovens to preheat to 350F
- 3:15 pm: pound flour into steak (3 lbs.) and cut into servings, then begin browning. While the Swiss Steak browns and the gravy is prepared:
- Shape the rolls (2 doz.) and place in pans
- Wash the lettuce for the salad (1 head) and crisp the leaves
- Prepare the celery curls and place in ice water
- Measure out olives and chill in the refrigerator
- Collect your tableware – dishes, glasses, silver, linens, and flowers – on a tray to carry to the dining room at table setting time. Have a clean tea towel handy to give a final polish to anything that needs it. Warming the dinner plates is a nice touch.
- Collect your serving dishes and chill dishes for serving cold food; warm dishes for serving hot food
- Fold napkins
- Clean cruet, make mustard if needed, and fill salt, pepper, sugar, mustard, oil, vinegar, etc. for the table
- 3:45 pm: put the Scalloped Potatoes in the oven.
- 3:55 pm: put the Swiss Steak in the oven
- 4 pm: tidy the house and prepare for The Mister’s arrival
- 4:30 pm: cut the butter and chill, prepare any garnishes
- 4:45 pm: prepare ice water (2 pitchers), measure out coffee for making right as dinner is served (1 pot)
- 5:00 pm:
- Put the rolls somewhere warm to proof
- Begin gently heating the chocolate sauce in the double boiler
- Whip the cream (1/2 pt.) to mix the the mayonnaise for salad dressing
- Collect the tray of tableware, carry it to the dining room, and set the table
- 5:30 pm:
- Plate the salads
- Open, heat, and season the peas (2 ½ lbs)
- 5:40 pm: Put rolls in the oven and remove potatoes and steak,
- 5:45 pm: Change for dinner
- 5:50 pm:
- Pour the ice water, and glasses of milk for children
- Pour and garnish the vegetable juice cocktail
- Put food in serving dishes
- Put the relishes and chilled butter on the table
- Bring warm dinner plates to table and place at host’s place
- Bring serving dishes to table
- Start the after-dinner coffee
- Place cocktail at each place
- 6 pm: Dinner is served – announce dinner
When I make this now, I make large batches of things like chocolate sauce and mayonnaise when I am in the kitchen doing other things (a good stand mixer can make a quart of mayonnaise in under 10 minutes). I make the roll dough at breakfast time, the salads at lunch time which gives plenty of time to chill. And I simply peel the potatoes (I’m fast at potatoes by now) while I make the white sauce, and put them straight into the pans. I am more likely to make ice cream than buy it, and a frozen custard can be mixed up at breakfast and freeze all day easily.

Step 4: Serve the Meal
How you serve the meal is a big part of creating a gracious and inviting family culture. Make dinnertime a special occasion. If your children eat with you, see to it that the Mister sits at the head of the table, that the table setting is attractive, and happy conversation prevails. Your children will respond to the mood you establish, and you are building family culture with every meal. Coming home to dinner can be the highlight of your husband’s day, especially if you use it to reinforce his authority and the family’s respect for him, through conversation and manners.
How To Set a Table
It also helps to have a step-by-step method for setting a table. Here’s mine:
- Check that the dining room is clean, not dusty, crumb-free, and a comfortable temperature
- Lay the cloth. Put down a pad first, if needed.
- Lay the silverware.
- Put the water glasses on the right, at the tip of the butter knife. Put the little plates on the left, at the tip of the fork.
- Place the centerpiece and candles.
How to Serve Family-Style WITHOUT a Maid
I don’t have a maid. Do you have a maid? If so, I envy you. But for now, this is the method I use. I usually serve at the table, family-style, so here’s how I put the food and plates at the end that I serve from:
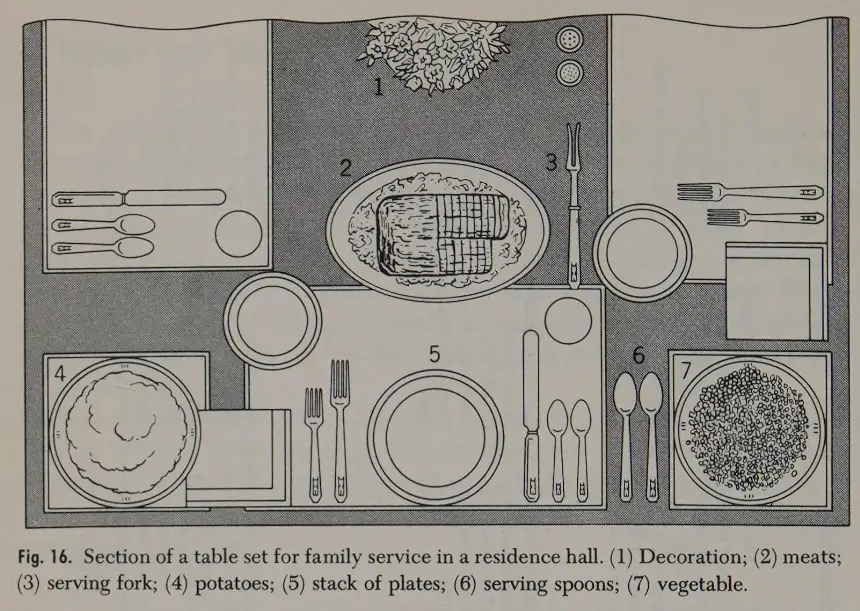
The dishes are placed in front of the host. The host then serves the warm dinner plates and asks that they be passed to the hostess (or the lady guest of honor, if present). The remaining plates are filled and passed. My husband likes to serve from the youngest to the oldest, with whoever is serving serving themselves last, so that’s what we do. The traditional method is to pass the plates down each side of the table to the person at the end and work back.
Next, bread, butter, and other accompanying dishes should be passed around the table, going in a clockwise direction. These are supposed to start at the hostess, but since we have the dishes set all around the center of the table, everyone starts the dish in front of them.
When clearing the table after the main course is finished, the food and serving dishes should be removed first. If the hostess is doing the serving, she should begin with the place at her right and proceed in a clockwise direction around the table, ending with the dishes at her own plate. If another family member is serving, the service should begin with the hostess. And, for salad and dessert courses, the hostess may serve in the same manner as the main course was served by the host.
Step 5: Clean Up Afterwards
This step is NOT the fun one. But it is super important. A basic kitchen cleaning routine that is done after every meal gives you a good working environment. If you don’t have a good cleaning routine for your kitchen, you’ll need to add at least 30 minutes (usually a full hour) to your dinner-making time. You can also assign these chores to your children and supervise them. Chores are good for children.
Here’s a super-simple step-by-step after-dinner (or breakfast or lunch . . .) routine that you can implement today:
- Clear the table, deal with the linens and crumbs, and quickly sweep the dining room floor.
- Scrape, rinse, and stack each dish according to size and in the order to be washed
- Store and refrigerate leftover food in proper containers.
- Empty garbage (food refuse) before you begin to wash dishes, being sure to drain off any moisture and to wrap securely.
- Wash, rinse, and dry dishes. Complete one operation at a time if you are working alone and for the average number of people. Usually this means that dishwashing will be completed before rinsing is done. This method is particularly successful if you have a spray attachment for rinsing.
- Glassware, silverware and fragile pieces are generally towel-dried. Dishes can be rinsed with scalding hot water and allowed to dry in the dishrack.
- When you finish washing dishes, wash out dish towels unless they are to go into weekly wash.
- Clean the sink.
- Check work areas, equipment, work surfaces and floor for any last jobs.
- Clean and wash counters and stovetop. Wipe down the outside of the oven and refrigerator.
- Dry mop kitchen floor (unless spotted and not previously cleaned, in which case, damp-mop the floor).
If you want a more in-depth description of what to clean in the kitchen and when and how, I have a whole article just about vintage kitchen cleaning.
And that covers my entire vintage meal-planning and -serving system!
Get Our Mid-Century Mom Daily Routine FREE!
Resources
The 1-2-3 of Homemaking, Marion Hurst
Primer for Hostesses, Dorothy Sara
The Better Homes and Gardens Cook Book
Parent’s Magazine Family Cookbook
Food for Fifty, Fowler and West


I love how well thought out this is! I am curious if you have noticed any differences in your health or the health of your family since adopting this type of meal planning? I think it is really interesting to consider how much of each food type your family members require each week, in contrast to current meal planning methods which don’t seem to put a lot of thought into that (or maybe that is just a defect of my current meal planning method). It is somewhat overwhelming, though, to see the quantities of food recommended for a large family. Out of curiosity, I added up the totals for my family and we would need 20 pounds of citrus/tomato and 36 pounds of other fruit!
I know! It is astonishing how much is recommended. And it is why I rely heavily on homemade bread and glasses of milk to “fill in the corners.”
I think that modern meal planning expects that everyone is taking multivitamins or other supplements. Most prepared foods are fortified. So there is less emphasis on this than in the 1940s when everyone could see the effects of a lousy diet AND unfortified foods. With modern fortified foods, hardly anyone has serious deficiencies. But I still prefer to use the old-fashioned methods.
As far as health, I DON’T use multivitamins at all. And everyone is healthy. I rely on sun exposure, cod liver oil, and citrus or tomato juice, just like the diet says. My kids mostly prefer lime juice with a pinch of salt, but that’s just a personal preference. It’s actually a lot less sugar than if you are drinking soda daily, even with desserts. I do know that it is really excellent for my food budget to think in terms of quantities needed though.
Fantastic overview, and very helpful, thank you so much, Emily!
Thank you! I’m glad it helps.